Désolé, mais cet article d’aide n’est actuellement pas disponible en français. Si vous le souhaitez, vous pouvez consulter une traduction automatique effectuée par Google.
Cet article d'aide concerne une ancienne version de Direct Mail.
Smart Groups show only the contacts that meet criteria you specify. They are a great way to easily and automatically segment your list. Here's how to create one:
- Choose Addresses > New Smart Group from the menu bar.
- Enter the name of the Smart Group
- Choose your filter criteria.
- Click OK.
You can edit the name and/or filtering criteria of your Smart Group at any time by double-clicking the group name in the Addresses tab.
Advanced Filtering
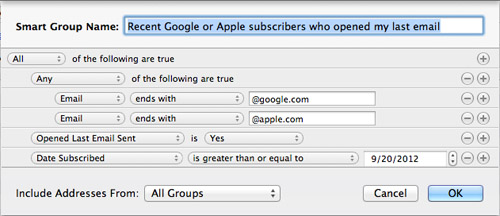
Smart Groups work just like Smart Playlists in the Music app, or Smart Albums in the Photos app. Use the "+" button on the right-hand side of the window to add additional filtering criteria. For more advanced logic, hold down the Option/Alt key while clicking the "+" button to create nested clauses (the "+" button becomes a "..." button when the Option key is held down). For example, let's say you wanted a smart group that would show you contacts with the following criteria:
    ( email ENDS WITH "@google.com" OR email ENDS WITH "@apple.com" )
AND opened my last email
AND subscribed on or after September 20, 2012
Here's how you would set it up: