Today we’re excited to introduce Direct Mail version 8.1, a helpful update that makes it easier to share campaign results and expands our integrations to include Eventbrite.
Share Campaign Reports as a Webpage
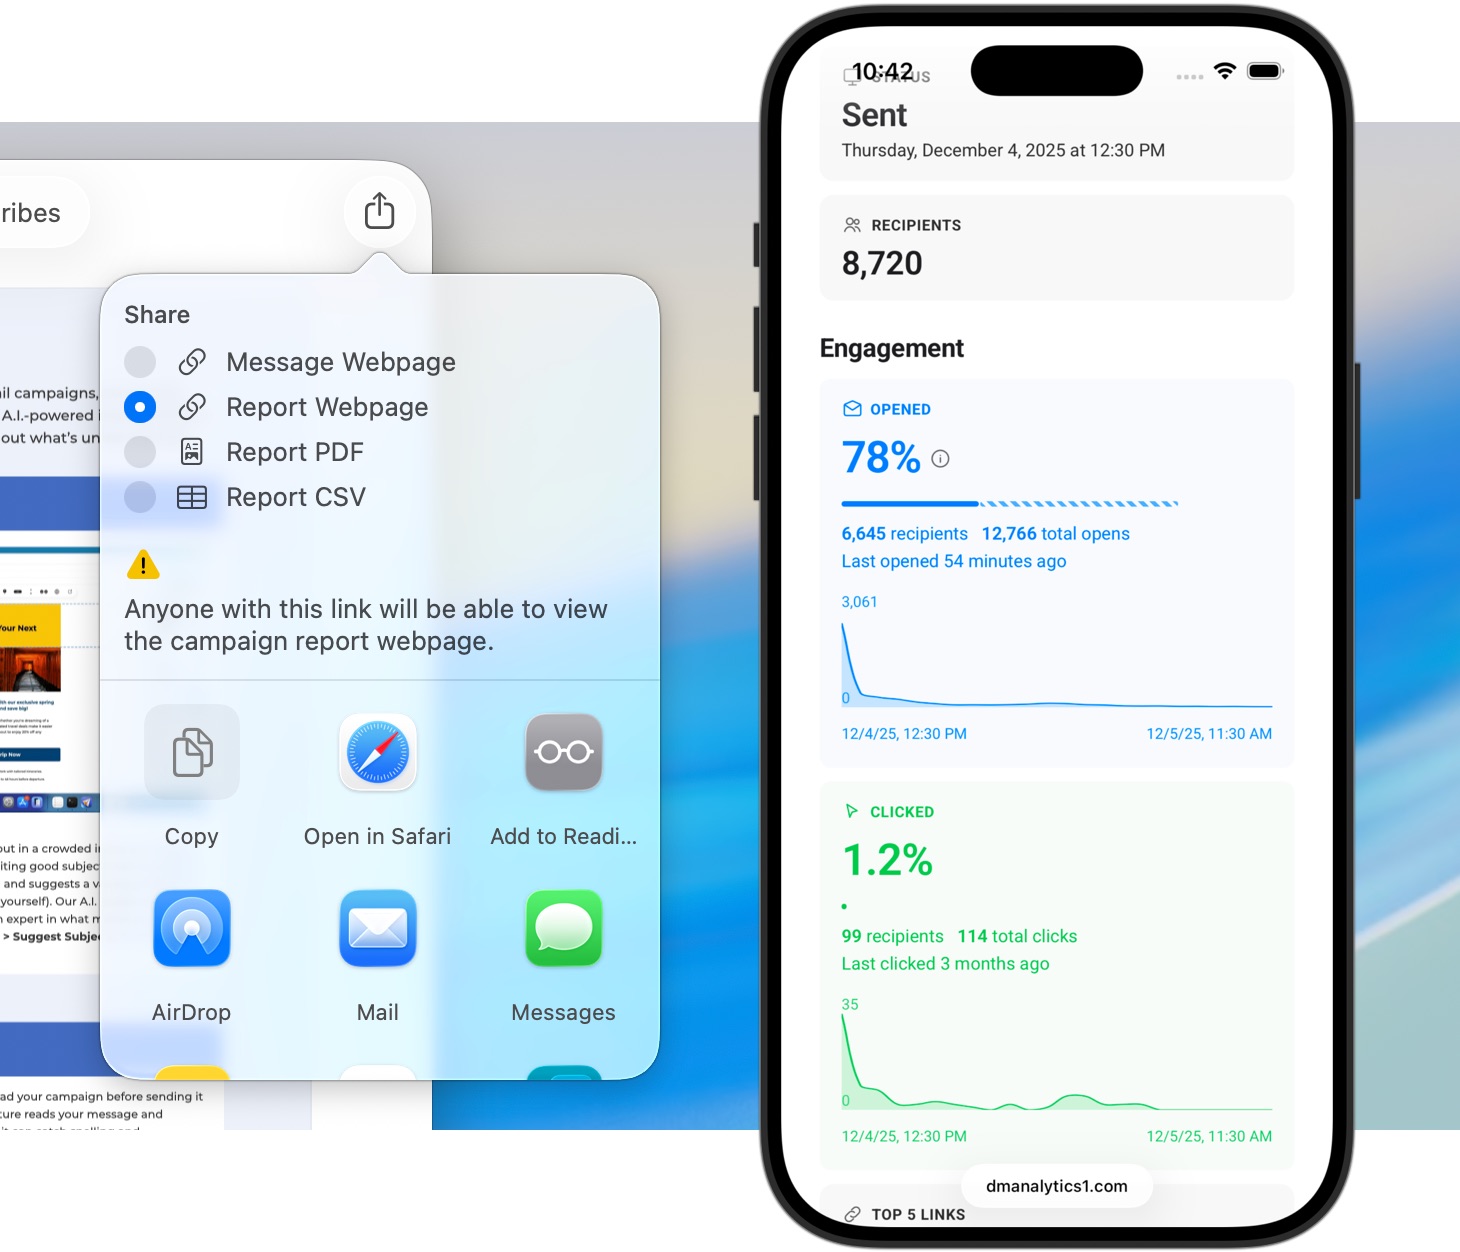
Your campaign reports are packed with useful information: opens, clicks, delivery results, engagement trends, and more. But sometimes the people who need to see those results are not the same people who use Direct Mail.
Direct Mail 8.1 solves that problem with report webpages. You can now share a campaign report as a live-updating webpage that anyone with the link can view in their browser—no Direct Mail app or Mac required. It’s a convenient way to keep clients, teammates, managers, or other stakeholders informed without exporting screenshots, building a PDF, or asking anyone to install software.
Import Attendees from Eventbrite
If you use Eventbrite to host classes, conferences, fundraisers, performances, workshops, or other events, Direct Mail 8.1 makes it easier to turn attendee information into useful follow-up campaigns.
You can now import attendee information directly from Eventbrite, including names, email addresses, contact information, ticketing information, and customer questions and answers. That means less time exporting spreadsheets and more time sending relevant, timely emails to the people who attended—or signed up for—your event.
Want to thank attendees after an event? Promote the next session? Send resources, reminders, surveys, or special offers? Direct Mail helps you bring your Eventbrite audience into your mailing list and keep the conversation going.
Available Now
Direct Mail 8.1 is available now. Update today to start sharing live campaign reports and importing Eventbrite attendees right into Direct Mail.
In most cases, your copy of Direct Mail should update automatically over the next few days. If you’d like to get the update right away, choose Direct Mail > Check for Software Update from the menu bar at the top of your screen.
Today we’re excited to introduce Direct Mail version 8.0, a powerful update that makes it even easier to grow your business with easy-to-use email marketing.
With new integrations for Shopify, Squarespace, and Google Contacts, Direct Mail helps you bring the people and content you already work with into one place—right on your Mac. We’ve also refreshed the app icon with a beautiful new look inspired by macOS Tahoe’s Liquid Glass design language.
Sell More with Shopify and Squarespace
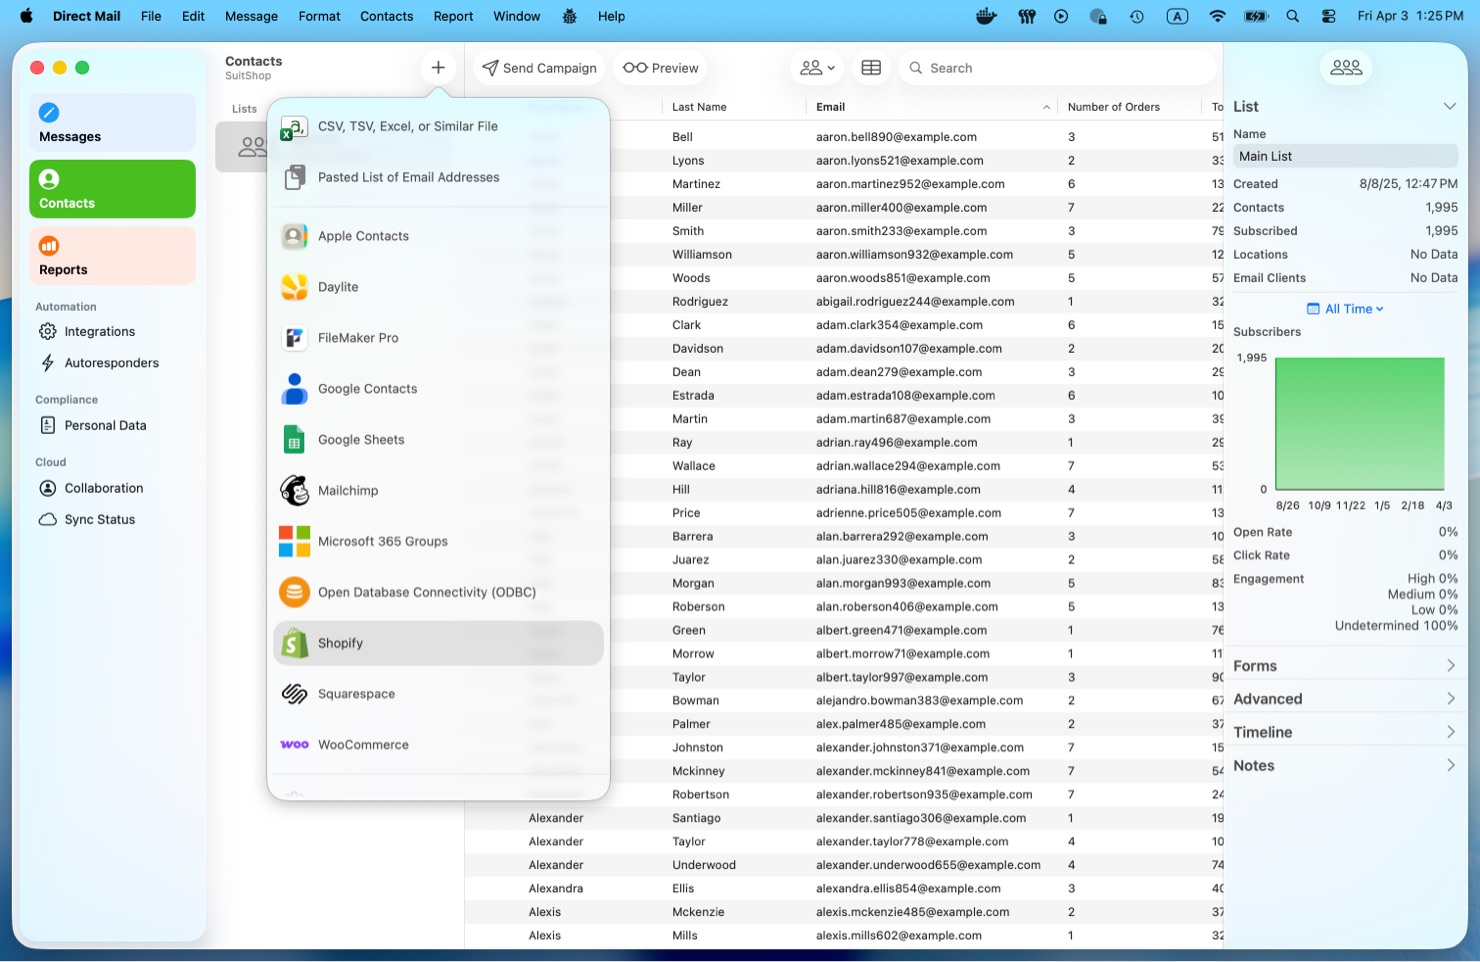
If you run your business on Shopify or Squarespace, Direct Mail 8.0 makes it simple to turn your store data into more effective email campaigns.
You can now import your customers—or prospective customers—directly from Shopify and Squarespace into Direct Mail. That means less time exporting spreadsheets and more time creating campaigns that actually drive results.
Want to encourage repeat purchases? Re-engage past buyers? Reach your most valuable customers with a special offer? Direct Mail gives you the tools to build focused, targeted campaigns that feel more relevant to the people receiving them.
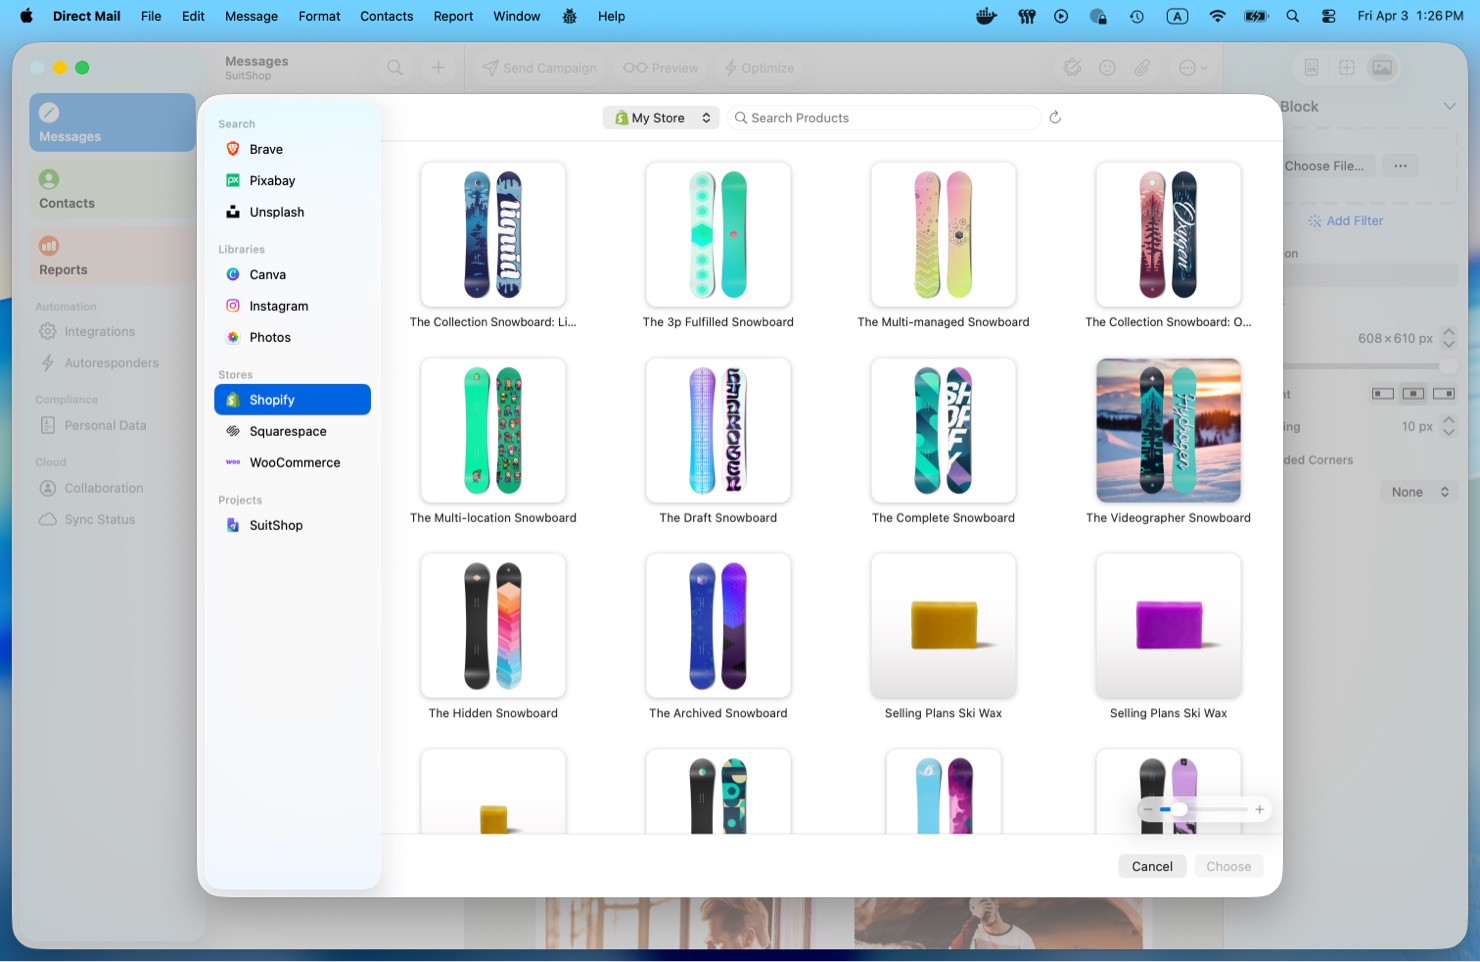
And there’s more: Direct Mail can also import your product photos from Shopify and Squarespace. That makes it incredibly easy to design polished, on-brand emails using the same visuals that already power your store. Whether you’re announcing a new product, featuring seasonal favorites, or sending a simple promotion, your images are right there when you need them.
Reach Leads Faster with Google Contacts
Direct Mail 8.0 also adds support for Google Contacts.
If you use Google Contacts to keep track of leads, prospects, clients, or other business relationships, you can now bring those contacts into Direct Mail with just a few clicks. It’s a handy way to turn your contact list into an outreach list—perfect for newsletters, announcements, follow-ups, or other email campaigns.
Instead of juggling multiple apps and manual exports, you can move from contact management to campaign creation much more smoothly.
A Fresh New Icon for macOS Tahoe
Version 8.0 also includes a refreshed app icon designed to feel right at home on macOS Tahoe.
Inspired by Tahoe’s new Liquid Glass aesthetic, the updated icon feels more vibrant, more modern, and more at home alongside the rest of your Mac. It’s a small detail, but one we think longtime Mac users will appreciate.
Available Now
Direct Mail 8.0 is available now. Update today and start creating smarter, more beautiful email campaigns with your store data, your contacts, and your favorite email marketing app.
Just in time for your holiday email campaigns, Direct Mail version 7.8 delivers a host of helpful A.I.-powered improvements that we hope you will love. Check out what’s under the tree:
A.I. Subject Line Suggestions
Engaging subject lines help your email stand out in a crowded inbox and make a huge difference in boosting open rates, but writing good subject lines is hard! Our new Suggest Subject feature reads your email and suggests a variety of different options for you to choose from (or further edit yourself). Our A.I. assistant has analyzed millions of email campaigns and is an expert in what makes a good subject line. Give it a try by choosing Optimize > Suggest Subject… from the toolbar.
Eagle-eyed readers will have spotted the Suggest Preview Text feature, as well. Preview Text (or a “pre-header”) is the short snippet of text that appears under or next to the subject line in your recipient’s inbox. It represents another opportunity to entice your recipient to open the email. The Suggest feature can give you great ideas for what to put in this space.
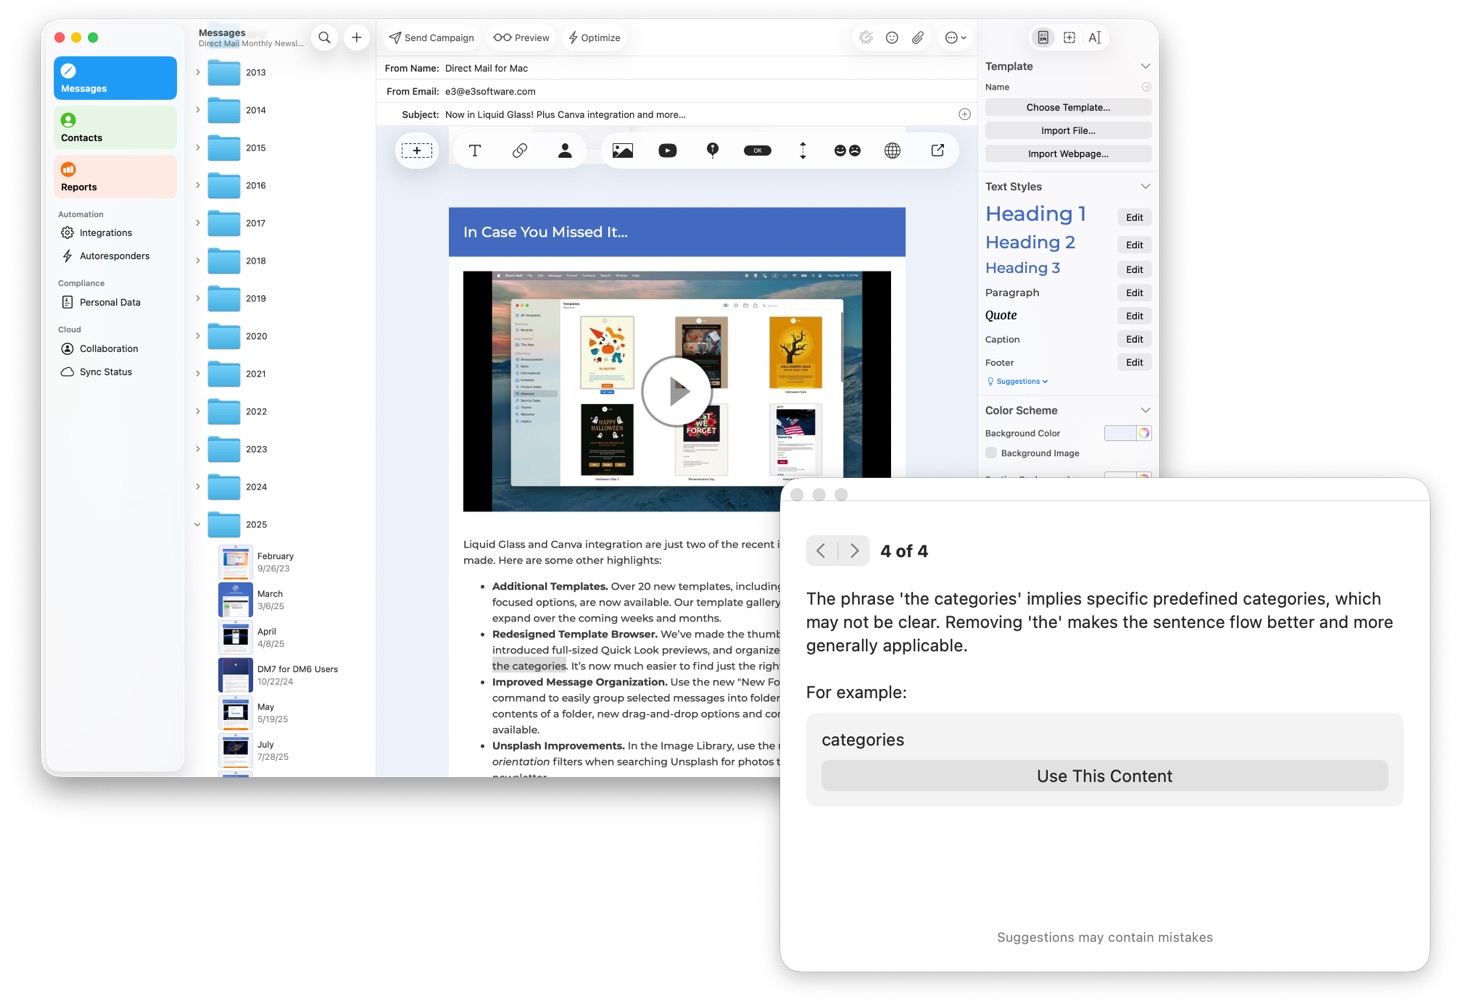
A.I. Proofreading
Ever wished for a second set of eyes to proofread your campaign before sending it out? Our Suggest Content Improvements feature reads your message and suggests ways it could be better. For example, it can catch spelling and grammatical mistakes, factual errors, and suggest adjustments to the tone or content of your message. As always, you stay in control and can accept or reject the various edits that are proposed.
Automatic Image Descriptions
The images that you use in your email can carry with them text descriptions, although most people usually forget to add them (we get it—it’s one more thing to remember!). However, there are some important benefits to adding in those descriptions:
Blind or low-vision users often use screen-reading technology (like VoiceOver) to read their email. When a screen reader encounters an image with a description, it can read it to the user instead of leaving them guessing at what the image is.
Some email clients do not display images by default for privacy, corporate policy, or data usage reasons. Text descriptions help your recipient understand the email even if the image is blocked.
Some spam filters look for “red flags” to identify junk mail—like large images without any descriptions. Accurate descriptions lend credibility to your message and signal that you are a responsible sender.
In Direct Mail 7.8, you can now generate descriptions for your images with just one click. Select your image, then click the “Suggest” button in the inspector. An A.I. model analyzes the image and comes up with a concise description in just a few seconds.
Image Playground
Apple’s Image Playground is an A.I. feature available on newer Macs that lets you to instantly create playful, stylized illustrations and graphics based on simple text prompts or photos from your library. It can be a fun and effective way to quickly create unique, copyright-free images—such as a custom caricature of your team or thematic graphics—that add a human, creative touch to your newsletter without the cost or time required for professional design.
To use Image Playground, select an image or image placeholder in your email, then click the “…” button in the inspector and choose “Image Playground”.
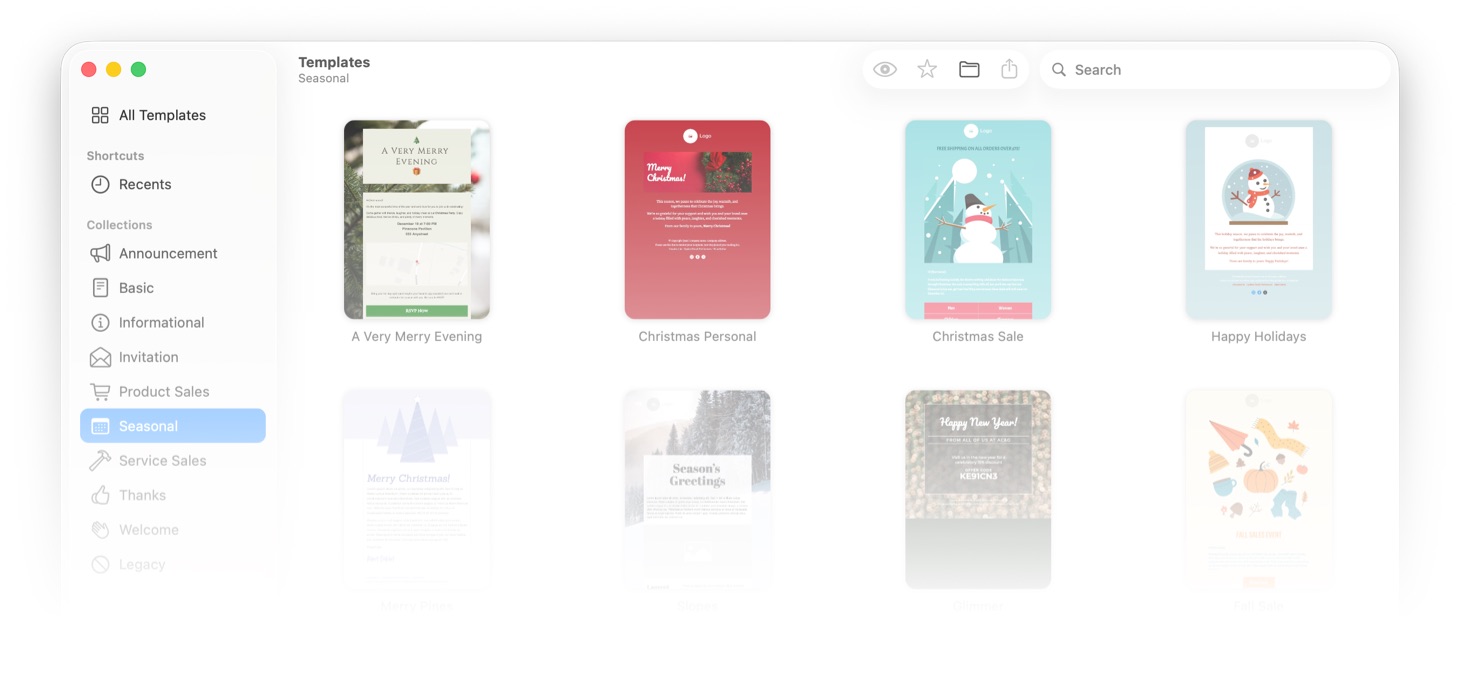
Holiday-Themed Templates
Just in time for the season, we’ve added a handful of new Christmas- and Holiday-themed templates to Direct Mail. Check them out under the Seasonal section of the template browser.
Anything Else?
Yes! This update also squashes several annoying bugs and brings other quality-of-life improvements. Check out the release notes for more information.
How to Update
Updating to Direct Mail 7.8 is free and easy-to-do. In fact, in most cases you won’t have to do anything. Your copy of Direct Mail should automatically update itself over the next few days. If you’d like to get the update right away, just choose Direct Mail > Check for Software Update from the menu bar at the top of your screen.
Thank you for being our valued customer and thank you for the great feedback you have sent us—please send more! It has been a wonderful year and we look forward to good things in 2026. Our sincere hope is that you have a wonderful Christmas and holiday season! See you next year!
macOS 26 brings a new Liquid Glass look to the Mac, and we’re proud to announce that the latest version of Direct Mail takes full advantage of the new look and feel. Your message content shines through the new glass toolbars, helpful menubar icons guide your eye to the commands you need, and sidebars come alive with beautiful material that adapts to your environment.
The new update is free for all users. Upgrade today by choosing Direct Mail > Check for Software Update from the menu bar at the top of your screen. Release notes are available here.
Today we released Direct Mail version 7.6, a terrific update that we recommend for all users, but especially those who have updated to macOS 26. You can update by choosing Direct Mail > Check for Software Update from the menu bar at the top of your screen. Customers who downloaded Direct Mail from the Mac App Store should have the update soon, pending Apple’s approval.
What’s in The Update?
You can check out the release notes for details, but highlights include:
Compatibility with macOS 26. If you used Direct Mail with the public beta of macOS Tahoe, you may have experienced app crashes. Version 7.6 addresses those crashes, delivering a stable, reliable experience.
Redesigned Template Browser. We’ve made the thumbnails larger, introduced full-sized Quick Look previews, and organized the templates into the categories. It’s now much easier to find just the right design.
Additional Templates. Over 20 new templates, including seasonal and sales-focused options, are now available. Our template gallery will continue to expand over the coming weeks and months.
What About Liquid Glass?
After updating, you’ll notice that Direct Mail has not yet adopted macOS Tahoe’s Liquid Glass user interface effects. This is coming soon in a future update. The goal of today’s update is to make sure that our users who update to macOS Tahoe have a stable, reliable Direct Mail app, as well as shipping several quality-of-life improvements (and new templates) to all our customers.
Update Today
Version 7.6 is a great update, with stability improvements, an expanded template library, and several quality-of-life improvements. We hope you update (for free) today! Questions? Please contact our customer support team. Stay tuned!